

 EN
EN  FR
FR  ES
ES 
At Webdeclic, we work on WordPress sites every day: creating showcase sites, redesigns, maintenance, optimization, security, WooCommerce, custom development, and taking over existing sites…
And over time, we realized something very simple: on almost every WordPress project, we were repeating the same steps.
Secure a few key locations.
Remove certain unnecessary features.
Prepare the site for the client.
Optimize media.
Avoid certain behaviors inherent to WordPress.
Install a child theme.
Add some handy little tools to save time.
The problem is that, before WPMasterToolKit, every little need often ended up with its own little dedicated plugin.
A plugin for SVGs.
A plugin to disable XML-RPC.
A plugin to limit login attempts.
A plugin for managing media.
A plugin for duplicating content.
A plugin to secure certain sensitive files.
And so on.
Taken individually, each of these plugins may seem insignificant. But over time, this complicates maintenance, increases dependencies, multiplies the number of interfaces, and makes each site a little harder to manage.
That is exactly why we created WPMasterToolKit.
Not just to add “yet another plugin.”.
But to avoid stacking several of them unnecessarily.
Our Approach at Webdeclic
At Webdeclic, we do not enable all WPMasterToolKit modules by default.
That's an important point.
WPMasterToolKit is a modular toolkit. The goal is not to enable everything everywhere, but to enable only what makes sense based on the site, the client, the technical context, and the project’s needs.
On our standard installations, we use a basic configuration that allows us to quickly set up a clean WordPress site that is more secure, easier to maintain, and better suited for professional use.
This configuration varies depending on the project, but it generally consists of several major families of modules.
1. Keep track of important actions
Update Logs
On client sites, we generally enable the module Update Logs.
Why?
Because a WordPress update can sometimes have visible consequences several hours or days later: display bugs, plugin conflicts, WooCommerce issues, forms that no longer work, changes to the admin panel…
Having a history of updates makes it easier to quickly understand what may have changed on the site.
And more recently, this module also lets you log who initiated the update, which can be very handy when dealing with customers who «flatly deny» having performed the update 😉.
We have also included the plugin activation/deactivation logs in this module.
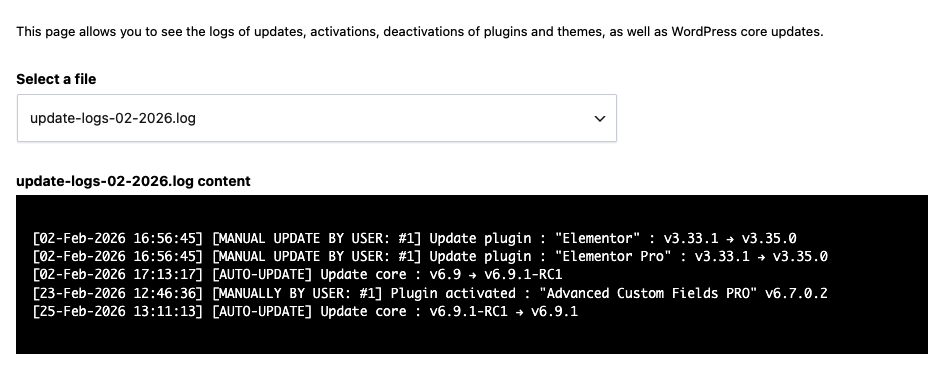
It's not a spectacular feature, but when it comes to maintenance, it's typically the kind of detail that can save a lot of time.
2. Allow certain useful features without adding a dedicated plugin
SVG Upload
We always enable the module SVG Upload.
On many professional websites, logos, icons, and other graphic elements are provided in SVG format. Depending on the configuration, WordPress doesn't always allow them to be uploaded natively, which leads many users to install a dedicated plugin just for that purpose.
With WPMasterToolKit, we can handle this need directly from within the same toolkit.
The benefit is simple: to meet a common need without burdening the site's stack with an additional extension.
3. Apply a WordPress security patch
A large part of our default configuration relates to security.
The point is not to claim that a plugin can replace a comprehensive security strategy. WordPress security also depends on hosting, updates, passwords, backups, user permissions, theme code, installed plugins, and so on.
But there are several simple settings that we like to quickly apply to a client's website.
Hide WordPress version
We are enabling the module Hide WordPress Version.
This helps avoid unnecessarily revealing the exact version of WordPress in certain parts of the site.
It's not some kind of magic protection, but it is a simple hygiene measure.
Disable file editing from the admin panel
We are activating Disallow WP File Edit.
By default, WordPress allows theme and plugin files to be edited from the admin panel. On a client’s site, we generally prefer to disable this feature.
This reduces the risk of human error and limits certain potential damages in the event that an administrator account is compromised.
Disable XML-RPC
We are activating Disable XML-RPC when the site doesn't need it.
XML-RPC is rarely useful on the modern websites we build, except in special cases. When it isn't necessary, we prefer to disable it to reduce an attack surface that is often targeted.
Lock the administrator email account
We are activating Lock Admin Email.
The site administrator's email address is sensitive information. On a client website, we want to prevent it from being changed too easily or by mistake.
Disable user registration
We are activating Disallow Register User on websites that do not require public registration.
For a standard showcase website, a corporate website, or many business websites, there is no reason to allow user registration.
Move the login URL
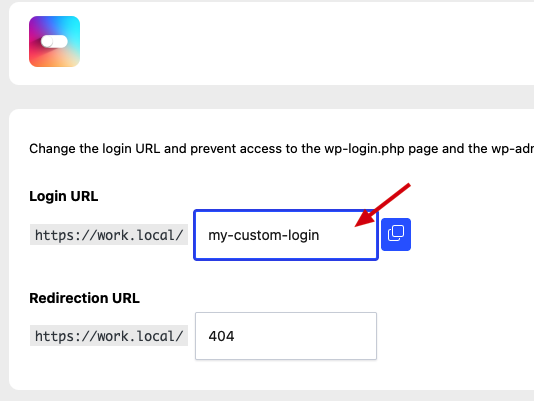
We usually enable Move Login URL.
This allows you to change the default WordPress login URL. Again, this isn't foolproof, but it does reduce some of the most basic automated attempts.
Once it's enabled, go to the settings page to change the URL:
Hide connection errors
We are activating Hide Login Errors.
By default, certain connection errors may provide unnecessary information—for example, whether or not the username exists. We prefer to make these messages less explicit.
Protecting Sensitive Files
We are activating Disallow Access WP Sensible Files.
Certain WordPress files or files related to plugins or themes should not be publicly accessible. This module adds an extra layer of protection.
Disable directory listing
We are activating Disallow Dir Listing.
When a server is misconfigured, certain directories may publicly list their contents. This is rarely desirable on a production site.
Block access to malicious files in uploads
We are activating Prevent Access to Malicious Files During Uploads.
The file uploads is intended to contain media files: images, PDFs, documents, etc. It should not be used to run suspicious files.
This module helps reinforce this point.
Automatic Regeneration of Security Keys
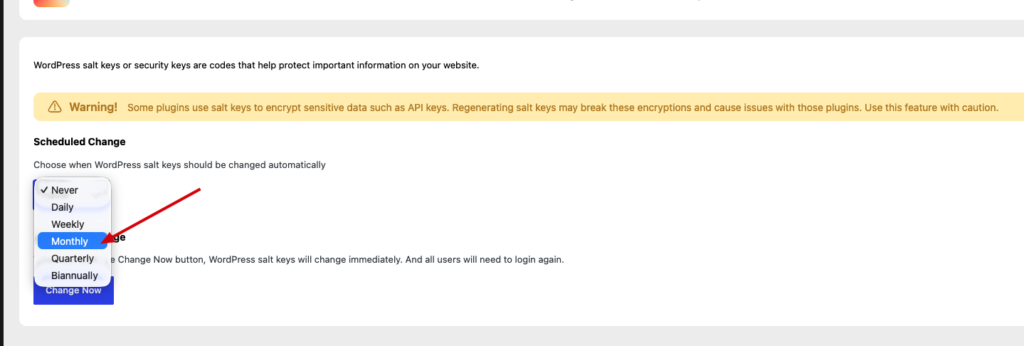
We are activating Auto Regenerate Salt Keys.
WordPress security keys play a role in managing cookies and sessions. Renewing them periodically can be helpful as part of a security hardening strategy.
Usually, this is set to monthly:
Hide PHP versions
We are activating Hide PHP Versions.
As with the WordPress version, the idea is to avoid unnecessarily exposing technical information about the server environment.
Limit connection attempts
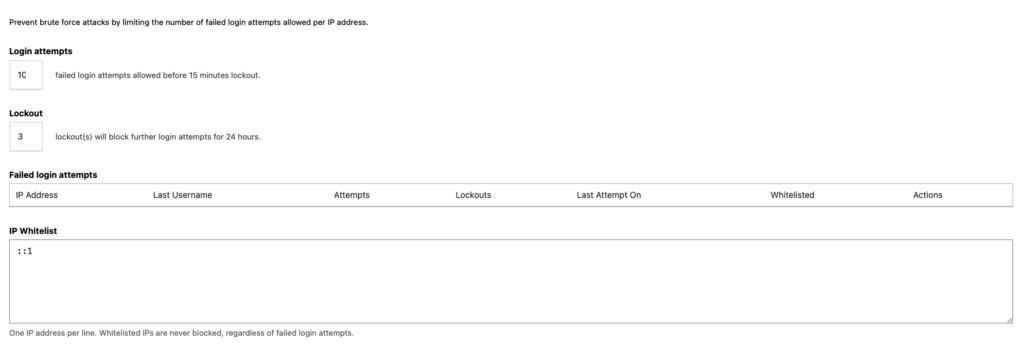
We are activating Limit Login Attempts.
It's a classic, but it's essential. Limiting login attempts helps reduce automated brute-force attacks.
We recommend increasing the limit to 10 if you have users on the site to avoid receiving too many support requests about this:
Prevent user enumeration
We are activating Prevent User Enumeration.
WordPress can sometimes allow user IDs to be guessed through certain URLs or requests. On a client's website, we prefer to limit this behavior.
Enforce SSL
We are activating Force SSL.
A professional website must function properly over HTTPS. This module helps us enforce the use of SSL when the site's configuration allows it.
Better Password Hash
We are activating Better Password Hash.
The goal is to improve how passwords are protected on the WordPress side, with a view to enhancing security.
4. Remove certain unnecessary elements from the source code
On many client sites, we also like to remove certain built-in WordPress elements that aren't always necessary.
Disable Shortlink Tag
We are activating Disable Shortlink Tag.
WordPress sometimes adds a shortlink tag to the source code. In our use case, it's rarely useful.
Disable Really Simple Discovery Tag
We are activating Disable Really Simple Discovery Tag.
This tag is related to legacy discovery mechanisms and is generally not necessary on the modern sites we deliver.
Disable Windows Live Writer Tag
We are activating Disable Windows Live Writer Tag.
The same logic applies: it’s a historical relic that’s rarely useful today.
Head Sorter
We are activating Head Sorter.
The module Head Sorter is useful for:
- Boost Speed : It reorganizes the header code (Capo.js method) so that the priority elements load first.
- Improve SEO : A faster website leads to better scores Core Web Vitals and a higher Google ranking.
- Automate Everything : It neatly organizes your plugins' scripts and styles without risking breaking the site.
In short: it's a smart storage for a website faster and better ranked.
5. Keep the sitemap under control
Disable WP Sitemap
We sometimes activate Disable WP Sitemap, especially when the site already uses a dedicated SEO solution that generates its own sitemap.
On client websites, it is important to avoid duplicates, inconsistencies, or sitemaps that do not align with the chosen SEO strategy.
This module is therefore not enabled “to harm SEO”—quite the opposite. It’s used to keep the configuration clean when the native WordPress sitemap isn’t the one we want to use.
6. Manage revisions to avoid unnecessary backlog
Revisions Control
We are activating Revisions Control.
WordPress updates are useful, but they can quickly pile up, especially on sites with a lot of content or multiple contributors.
We prefer to keep a reasonable amount of historical data rather than let the database fill up unnecessarily.
7. Simplify content management
Content Duplication
We are activating Content Duplication.
On a website under construction or undergoing maintenance, duplicating pages, articles, or custom content is a real time-saver.
This is typically a feature for which many sites install a dedicated plugin. With WPMasterToolKit, we can have it as part of our comprehensive toolkit.
8. Better Manage Images and Media
Media is an important topic on WordPress sites.
Images that are too large, incompatible file formats, a disorganized media library, unused files… On some websites, the media library quickly becomes a real problem.
At Webdeclic, we typically enable several media-related modules.
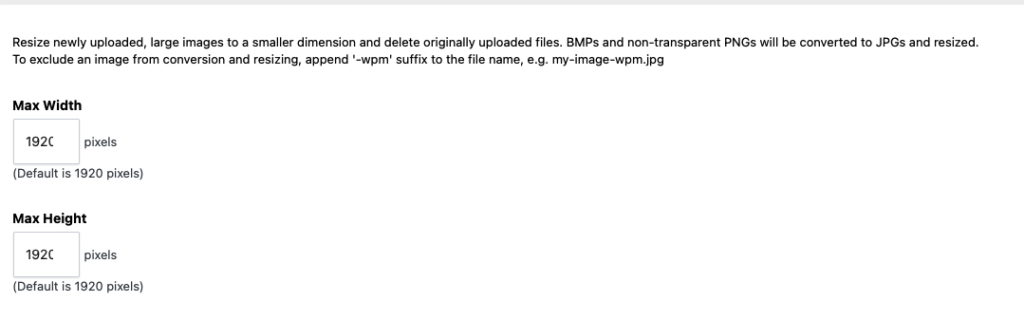
Image Upload Control
We are activating Image Upload Control.
This sets a limit on the maximum allowed size for an image (in pixels).
Media Encoder
We are activating Media Encoder.
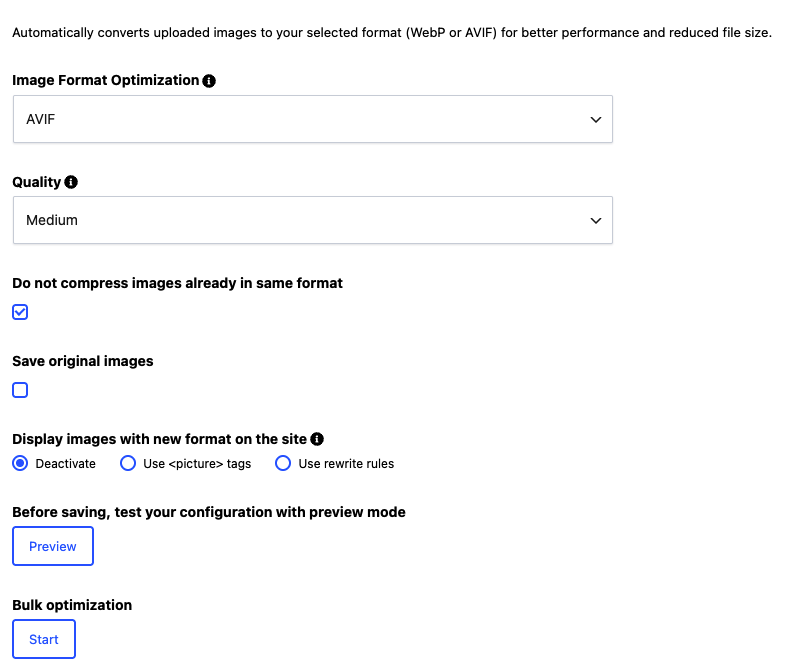
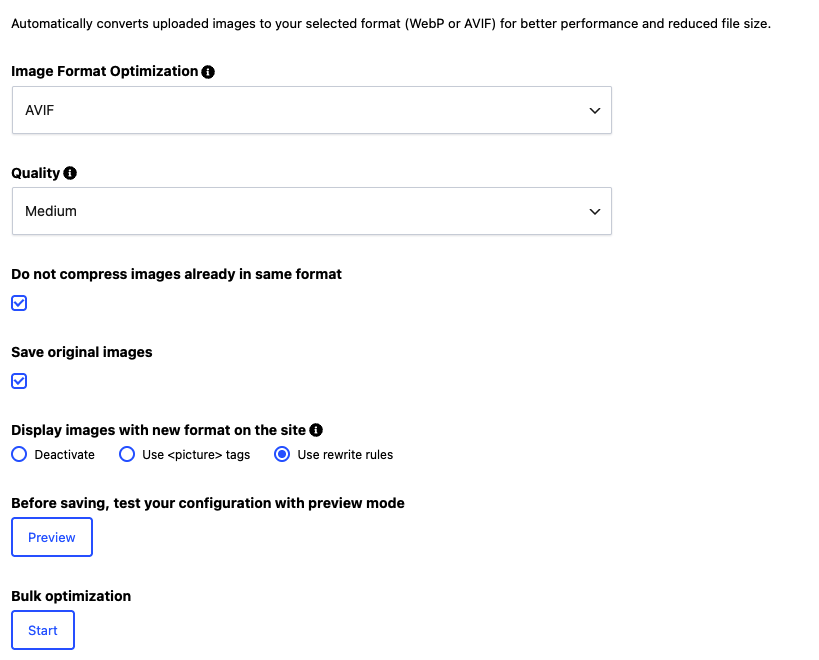
The goal is to optimize images and convert them to modern formats such as WebP or AVIF, depending on the configuration.
This is an important module, because images are often one of the main causes of slow performance on a WordPress site.
Here's the configuration we recommend on a brand-new website:
For a website that already contains a large number of images, we recommend the following configuration:
Media Cleaner
We are activating Media Cleaner.
This module helps identify or remove certain unnecessary media files, depending on the context. It is particularly useful on older sites, migrated sites, or sites that have undergone multiple redesigns.
Paste Image In Media
We are activating Paste Image In Media.
It's a small convenience feature, but it's very useful when creating content. It saves time when you regularly work with screenshots or copied-and-pasted images.
9. Improve the reliability of email delivery
SMTP Mailer
We systematically enable SMTP Mailer.
On a business website, WordPress emails are important: contact forms, WooCommerce notifications, account creation, password recovery, administrator alerts, and more…
Sending emails natively via PHP's `mail()` function is rarely the best solution.
Configuring an SMTP server improves deliverability and gives you greater control over your email campaigns.
10. Monitor vulnerabilities
Vulnerabilities Scan
We are activating Vulnerabilities Scan.
From a maintenance perspective, it is essential to have visibility into potentially vulnerable extensions, themes, or components.
This is not a substitute for comprehensive monitoring or active maintenance, but it is a useful indicator on the dashboard.
Here's what it looks like:

11. Generate a child theme, then deactivate the module
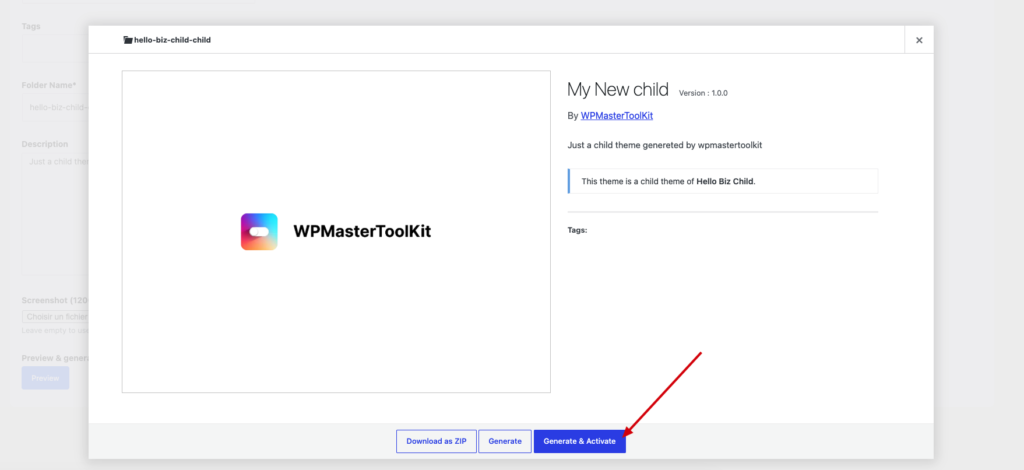
We also use the module Child Theme Generator.
But here’s an important detail: we disable the theme once it’s been generated.
In our workflow, this module is used occasionally when starting a project or during a site takeover.
We generate the child theme, make sure everything is in order, and then we can deactivate the module.
That's exactly the point of a modular toolkit: some modules are always useful, while others are only needed at a specific point in the project.
12. What We Don't Enable by Default
An important point to note when using WPMasterToolKit: many modules are disabled by default.
Not because these modules aren't useful.
But because they depend heavily on context.
For example, disabling Gutenberg may be appropriate for some sites, but not for all of them. Disabling the REST API can cause problems with certain plugins or modern use cases. A File Manager or Adminer can be very handy during development or troubleshooting, but it’s not necessarily something we want to keep active all the time on a client’s site.
Our rule is simple:
Enable only those features that meet a genuine need on the specific site.
Why This Approach Saves Us Time
This setup allows us to start with a cleaner foundation for WordPress projects.
It helps us:
- reduce the number of small plugins installed; ;
- standardize certain settings across our client sites; ;
- improve basic safety; ;
- save time on deliveries; ;
- make it easier to see which features are active; ;
- avoid having too many administration interfaces; ;
- Easily disable features you no longer need.
The most important thing isn't just the number of modules available in WPMasterToolKit.
It's the ability to choose exactly which ones are active.
An all-in-one plugin can quickly become resource-intensive if it loads everything everywhere.
WPMasterToolKit is based on a different approach: each module can be enabled or disabled as needed.
Free Version and PRO Version: How We See Them
The free version of WPMasterToolKit already meets many common needs.
It's on purpose.
We want the free version to be truly useful, especially for freelancers, agencies, WordPress administrators, and website owners who want to simplify their tech stack.
The PRO version offers even more for users who want access to advanced features, to save time on more specific tasks, or to further streamline their WordPress workflow.
At Webdeclic, WPMasterToolKit was born out of a real-world need: to manage our own client websites more efficiently.
We continue to follow this approach as we develop the plugin.

Conclusion
WPMasterToolKit was not created to replace true WordPress expertise.
It was created to save time on repetitive tasks, avoid unnecessarily piling up small plugins, and centralize the features we actually use at the agency into a single interface.
At Webdeclic, we use it as a modular toolkit.
Some modules are enabled on almost all sites.
Others are used on an ad hoc basis.
Others remain disabled until they serve a specific purpose.
It is this flexibility that, in our opinion, is the true strength of WPMasterToolKit.
Just one plugin.
Modules that can be activated on an as-needed basis.
Fewer dependencies.
More control.
And above all: an approach designed for real-world applications in the field.
